

Your saddle must fit two athletes: your horse and you. Get the rider fit wrong and you’ll fight balance, tip your weight into the wrong place, and risk your horse’s back health.
Key takeaway: Aim for 3–5 fingers of gullet clearance front-to-back, at least 4 fingers over the withers when girthed with you on board, and a rider seat that leaves 3 fingers to the cantle with your knee comfortably supported—then recheck seasonally in UK conditions.
Why rider saddle fit matters
Rider saddle fit directly affects your balance and your horse’s welfare, yet the UK has no published, industry-wide rider-fit guidelines; Hartpury University is working to change that with a new study involving 60 horse–rider pairs.
We’ve long had solid horse-fit principles, but rider fit has lagged behind. Hartpury University’s 2024 project is bringing SMS-accredited fitters and coaches together to define practical guidance for the rider side of the partnership. As Associate Professor Dr Kathryn Nankervis explains:
“This ambitious study sets out to provide evidence-based guidance developed in conjunction with the saddle fitters and coaches tasked with working with all types of riders... Improving our understanding of how best to support riders to ride ‘in balance’ will have benefits not only for rider training but for the combined health, welfare and performance of horse and rider partnerships.”
It matters because poor fit is a welfare issue. World Horse Welfare, working with the Animal Health Trust, is unequivocal:
“A poorly fitting or maintained saddle can cause injury and welfare problems for your horse... maintain your saddle properly and to make sure it fits both yourself and your horse throughout the year.”
On the ground, that means checking horse-fit fundamentals every time a horse changes shape and making sure you, the rider, are secure in the saddle rather than perched on top.
The essential horse-fit checks
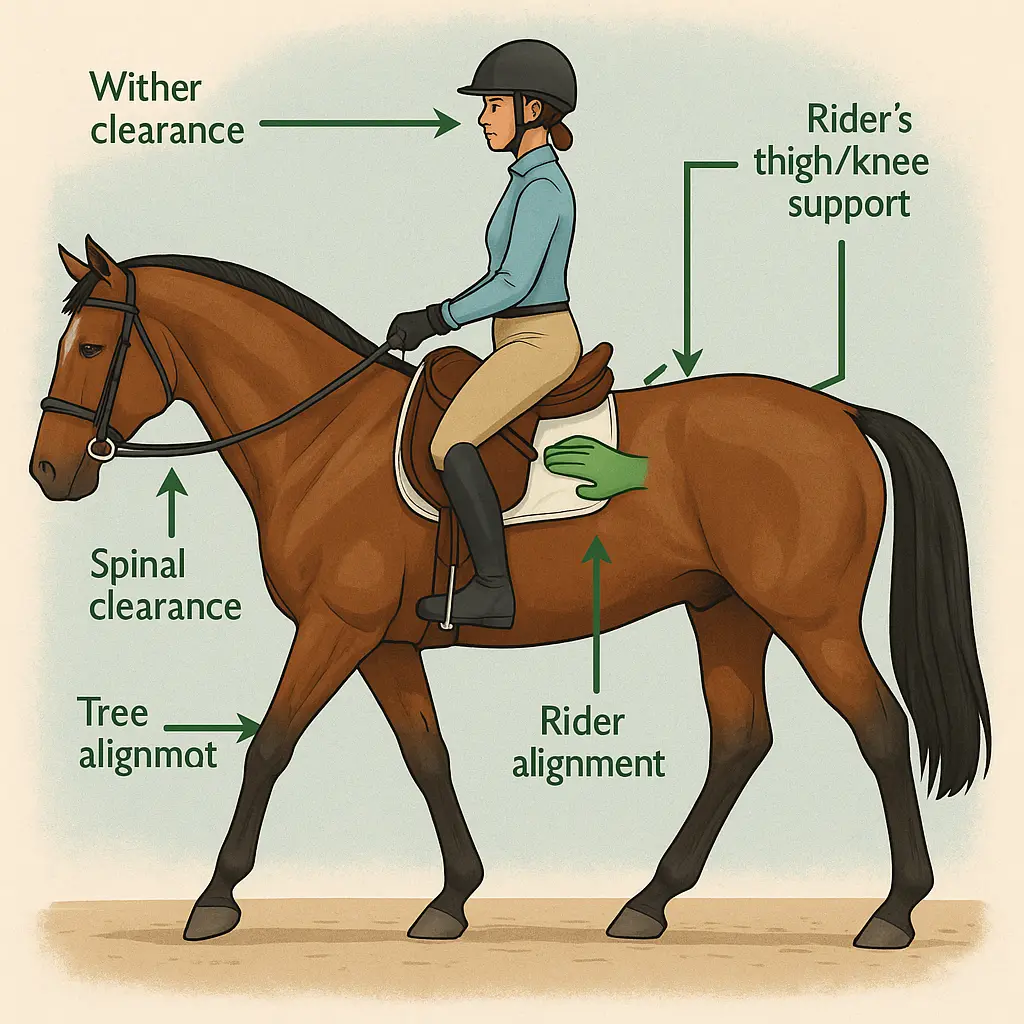
For most horses, you need 3–5 fingers of gullet clearance all the way from front to back and at least 4 fingers over the withers once the girth is done and you’re in the saddle.
These numbers protect the spine and withers and help keep the saddle in neutral balance. The gullet channel should never narrow at the rear because the spine does not: you’re looking for consistent space and even contact along both panels.
Two core checks you can rely on:
- Gullet and spinal clearance: According to UK guidance from Horsemanship Saddlery, “3–5 fingers, ALL THE WAY from front to back.” If you can’t run your hand comfortably from pommel to cantle beneath the panels without pinching at the back, the channel is too narrow. Source
- Wither clearance: You want a minimum of four fingers above the withers. Check it three times—ungirthed, girthed, and girthed with you mounted—because clearance can drop under load. Source
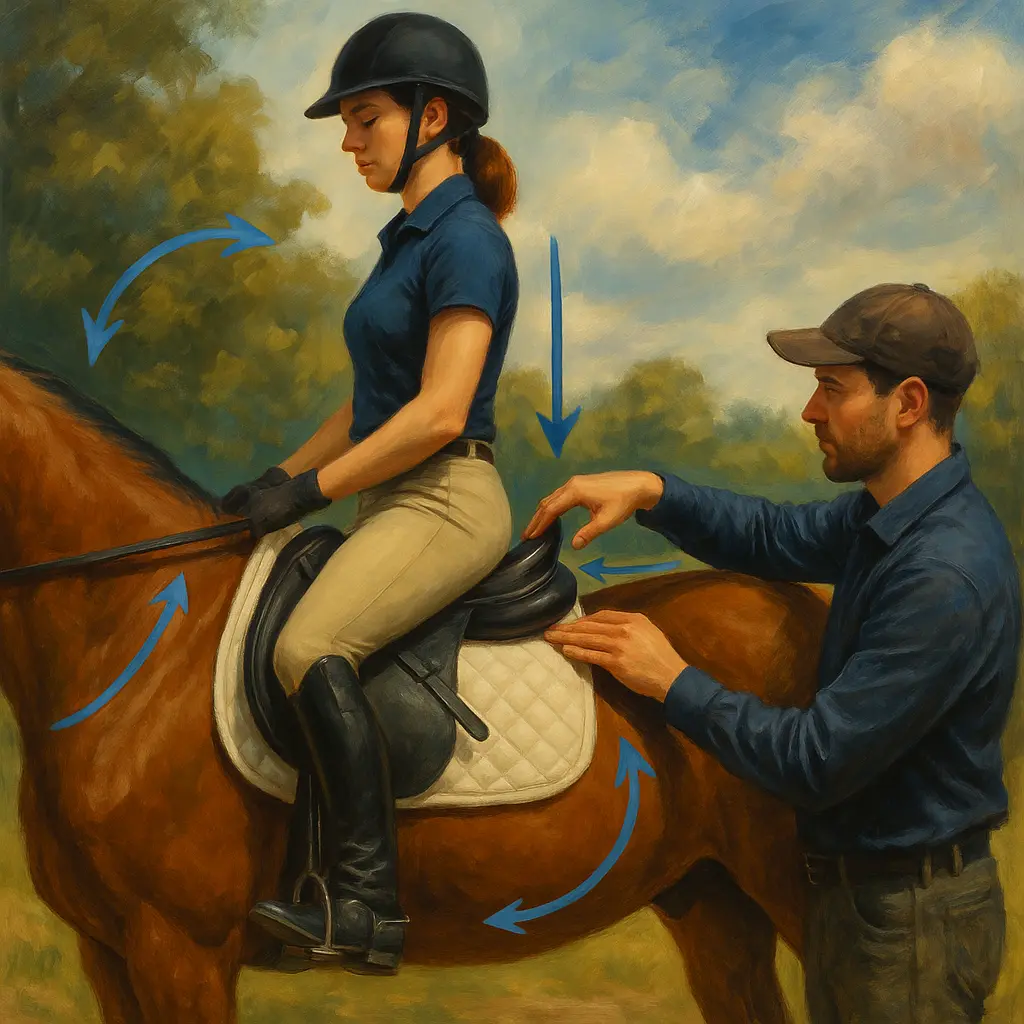
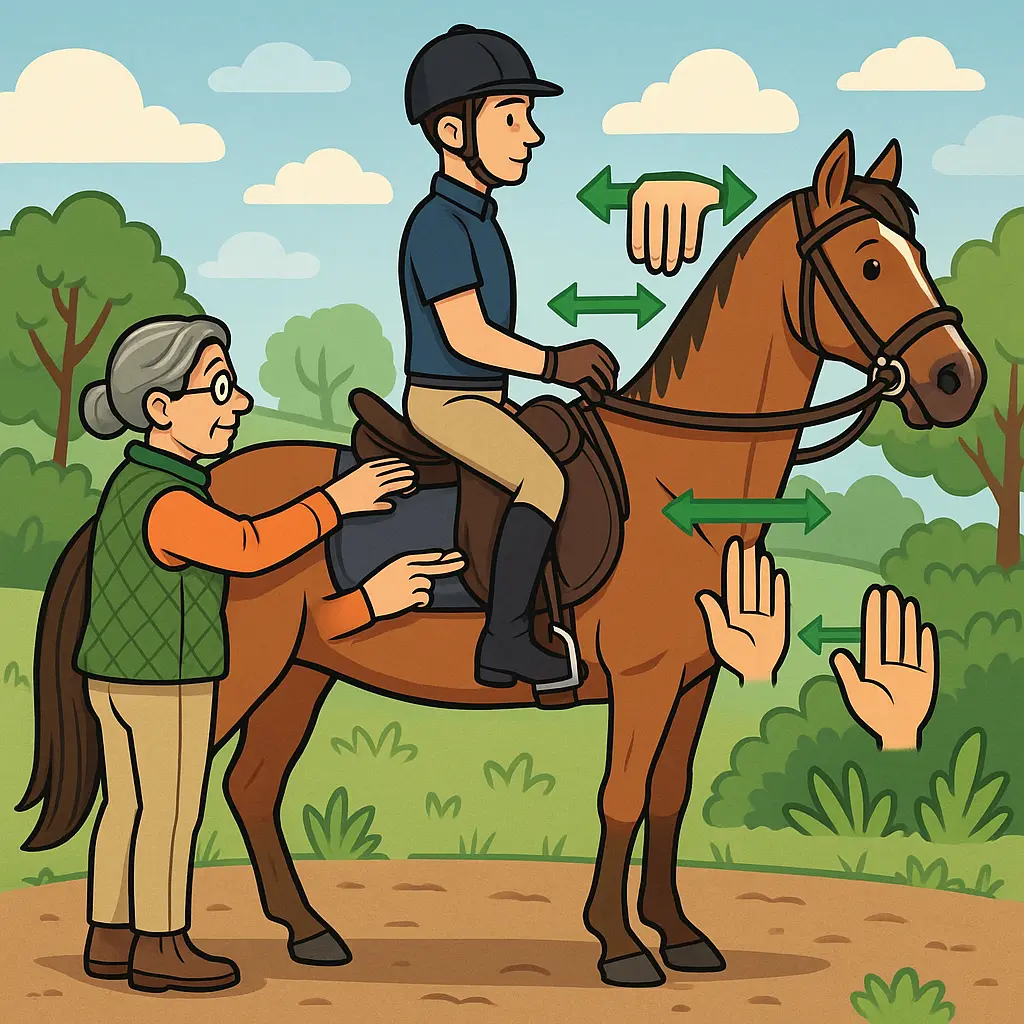
Balance check: Place one hand on the pommel and one on the cantle. Apply light, alternating pressure. Minimal movement means the tree is sitting neutrally. If the cantle lifts, the pommel is too high—this shunts your weight backwards and risks muscle atrophy behind the saddle.
Tree points and shoulder: From the side, the tree points should mirror the angle of the horse’s shoulder. If they stick inward, the tree is too narrow; if they stand away, it’s too wide. Either error can block the shoulder and change stride length.
Quick tip: Run your hand down the panel under a girth with normal tension. You’re checking for even pressure—no hard spots, no gaps—and that 3–5 finger spinal clearance remains consistent through the rear gullet.
Getting the rider fit right
Choose a seat size that leaves three fingers between your bum and the cantle, use blocks that place your knee in a natural ‘sweet spot’ without twisting, and make sure the top of your boot sits at least 5 cm below the saddle skirt.
Rider-fit fundamentals:
- Seat size: Sit normally. You should be ‘in’ the saddle, not perched on top, with three fingers of space to the rear cantle. Too small and you’ll tip forward; too large and you’ll slide and struggle to stabilise your pelvis. Source
- Blocks and thigh support: Well-positioned knee and thigh blocks should cradle your leg without forcing it. If your knee is pushed off the block, or your thigh twists outward, the setup is wrong for your leg length or femur angle. Adjust or choose different blocks to find the sweet spot.
- Skirt and boot clearance: Keep the top of your riding boot at least 5 cm below the skirt to prevent trapping and allow subtle leg aids. If your boot constantly catches, you’ll tense and your aids will become noisy. Source
Comfort matters, especially for midlife riders with inner thigh stiffness. A correctly sized seat and sympathetic blocks reduce gripping and let you lengthen through the hip without strain. Pair your saddle fit with supportive legwear like well-cut breeches (consider grippy seat options) and boots that allow a quiet lower leg. Explore our selection of women’s jodhpurs and breeches and choose tall boots with the right height and cut from our horse riding boots collection to match your saddle’s skirt length.
A step-by-step saddle fit check you can do today
Use this 10-minute routine before your next ride to confirm both horse and rider fit without special equipment.
- Assess your horse’s back: Stand your horse square on level ground. Note any seasonal changes—more rib coverage after winter, or topline development after a training block. Smooth the coat with a soft brush from our grooming range so you can feel landmarks clearly.
- Place the saddle without a pad: Position it behind the shoulder blade. Check initial wither clearance (aim for four fingers) and that the saddle sits level from pommel to cantle.
- Girth normally: Recheck wither clearance—still four fingers? Now slide your hand under the front, middle, and rear of each panel. You’re looking for even pressure and that 3–5 finger gullet space front-to-back remains consistent.
- Check tree points: From the side, confirm the tree points match the shoulder angle. If they dig in or flare out, stop and consult a fitter.
- Balance test: Lightly press alternately on pommel and cantle. If the cantle lifts, the front is too high; if the pommel lifts, too low.
- Mount and recheck: Sit centrally. Reassess wither clearance with your weight in the saddle (still at least four fingers) and eyeball overall levelness.
- Rider seat size: With your normal stirrup length, check you have three fingers to the cantle. Your thigh should rest comfortably on the block without pain, pinching, or twisting.
- Leg freedom and skirt: Ensure your boot top is at least 5 cm below the skirt. Practise transitions; your leg should drape without catching.
- Short walk and trot: Feel for straightness, no lateral slipping, and no cantle ‘pop’. Listen to your horse—short steps or tail swishing can signal discomfort.
- After-ride check: Lift the saddle and assess sweat marks. Symmetrical, even dampness suggests even pressure; dry spots within wet areas can indicate bridging or pressure points.
Quick tip: Always wear your hat when mounting for these checks. If you need a new one, our curated range of certified riding helmets will keep you safe while you test.
At Just Horse Riders, we recommend trialling more than one saddle where possible and booking regular follow-ups; your horse’s musculature will change with work and seasons, and you deserve a configuration that fits your body just as precisely.
Seasonal fit and maintenance in UK conditions
Plan 2–4 professional checks per year because UK horses change weight and shape with the seasons, and wet winters demand extra leather care and fit monitoring.
World Horse Welfare highlights seasonal fit as a welfare priority: when forage-heavy diets, reduced turnout, or clipping patterns change condition, saddles that were fine in September can pinch in January. Build a simple calendar:
- Autumn: As grass drops, some horses gain weight with added forage and less hacking time. Recheck gullet clearance and panel contact.
- Mid-winter: Wet, muddy weather and heavier turnout rugs can flatten coats and alter how the saddle sits. Check balance and wither clearance again—especially after a clipping routine.
- Spring: As work increases, topline often returns. Reassess tree points against the shoulder and evenness along the panels.
- Summer: Heat and lighter stable rugs or fly sheets mean less bulk under the saddle; ensure the saddle doesn’t sit lower than expected.
Maintenance makes a measurable difference. Clean and condition leather so panels stay supple and surfaces don’t slip. Our grooming and care selection includes the essentials to keep tack in working shape during damp spells. For rugs that support consistent condition, look at reliable UK favourites like WeatherBeeta turnout options to keep backs dry and comfortable through the worst of the weather.
Quick tip: Never “pad up” a poorly fitting saddle as a long-term fix. Extra pads can change balance and reduce wither and gullet clearance; address the root fit instead.
Standards and professionals to trust
Use an SMS-qualified saddle fitter and follow UK national occupational standard LANEq210 when fitting saddles and tack for ridden exercise.
LANEq210 (2017, current) sets out how saddles, snaffle bridles, martingales, nosebands, breastplates, bits, and boots should be fitted for ridden work in the UK, including approaches that minimise stress for the horse and appropriate PPE for handlers. You can read the standard here: LANEq210.
The Society of Master Saddlers (SMS) maintains rigorous training and assessment for fitters. Combine their horse-fit expertise with rider-specific input—exactly the gap Hartpury’s new research aims to fill. If you’re struggling with thigh pain, a perched feeling, or difficulty keeping your leg under you, an SMS fitter can adjust blocks and guide you to a seat size that supports your anatomy.
Pro tip: Take your usual boots and breeches to fittings to replicate your normal riding posture. If you need to refresh kit before a session, browse tall riding boots and comfortable, grippy breeches so your leg sits predictably every time.
Common mistakes and quick fixes
The most common mistakes are narrow gullets, insufficient wither clearance, and oversized seats that leave riders sliding; fix by rechecking measurements, adjusting blocks, and reassessing balance under the rider.
- Too-narrow gullet: If you can’t maintain 3–5 fingers of channel space all the way back, stop using the saddle and consult a fitter. Narrow channels can impinge the spine and longissimus muscles.
- Wither clearance only checked ungirthed: Always confirm at least four fingers with the girth done and with rider weight. Clearance often drops once mounted.
- Seat too big or small: More than three fingers to the cantle can leave you behind the movement; less can pitch you forward. Measure, don’t guess.
- Blocks forcing position: A block that hurts your knee or twists your thigh is counterproductive. Choose alternative shapes or adjustable options.
- Ignoring balance: A high pommel shifts weight to the back, stressing the thoracolumbar region; fix the balance before riding on.
- Seasonal blind spots: New clip, new rug thickness, or a condition change? Recheck fit that week, not “later”.
Quick fix checklist: rebalance the saddle, confirm gullet and wither clearance under load, and test ride briefly in walk and trot before schooling.
Helpful kit to support balance and comfort
Choose adjustable-block saddles, supportive breeches, well-fitted boots, and simple measuring habits to make rider-fit easier day to day.
What helps most in practice:
- Adjustable knee/thigh blocks: Fine-tune leg support for short or long thighs so your knee finds the block without pain or twist.
- Supportive legwear: Grippy-seat breeches improve stability without gripping. See performance options from leading brands like LeMieux in our women’s breeches collection.
- Boots that match skirt length: A tall boot with the right height and cut ensures that 5 cm clearance under the skirt, preventing trapping. Explore our curated riding boots.
- Rug strategy for shape consistency: Consistent, appropriate rugging helps maintain condition and coat quality under the saddle. Browse durable winter turnout rugs and breathable options in reputable ranges like WeatherBeeta.
- Condition support: Work and nutrition build topline; if you’re tweaking diets, consider targeted additions from our supplements range alongside training and professional advice.
- Safety and visibility: Keep checks and test rides safe with certified riding helmets and practical hi-vis for roadside hacking.
- Value finds: If you’re upgrading kit ahead of a fitting, look at our Secret Tack Room clearance for quality bargains.
Quick tip: Keep a simple fit log on your phone—date, wither clearance count, gullet finger width, balance result, and any changes in work or rugging. Patterns make decisions easier.
Putting the numbers to work
Commit to the key measurements—3–5 fingers in the gullet front-to-back, four fingers at the withers under load, three fingers to the cantle for you—and you’ll prevent most fit problems before they start.
One of the clearest statements on spinal clearance comes from UK saddle specialists:
“The gullet must be wide enough not to interfere with the spinal processes or musculature... 3–5 fingers, ALL THE WAY from front to back.”
Combine that with a balanced tree and rider geometry that keeps your thigh softly on the block, and you’ll ride ‘in’ the saddle, not on it—a difference you’ll feel in your horse’s rhythm and your own ease of movement.
At Just Horse Riders, we recommend pairing these simple checks with regular professional input. The right saddle—and the right setup for your body—pays you back every ride with harmony, comfort, and better performance.
FAQs
How do I know if my saddle seat fits as a midlife rider with inner thigh stiffness?
Make sure you have three fingers between your bum and the cantle and that you feel ‘in’ the saddle, not perched. Your knee should sit naturally in the block’s sweet spot without pain or twisting; if not, change block shape or position. Source
What clearance do I need around my horse’s spine?
You need 3–5 fingers of gullet channel space from front to back, with even pressure under the panels. Recheck once girthed up to confirm nothing narrows at the rear. Source
How much wither clearance is correct?
At least four fingers—checked ungirthed, girthed, and with you mounted. Clearance can drop under load, so confirm it in all three states. Source
How often should I check saddle fit in the UK?
Seasonally. World Horse Welfare recommends regular checks as condition changes; aim for 2–4 professional fittings per year to reflect UK weather and workload shifts. Source
What are signs of poor rider saddle fit causing thigh discomfort?
Knee or thigh pain on the blocks, an outward twist in your leg, or a perched feeling in the seat. A different seat size or block setup and an SMS-qualified fitter can resolve this. Hartpury research context
Does UK regulation cover saddle fitting?
Yes. LANEq210 sets out the national occupational standard for fitting saddles and related tack for ridden exercise, including stress-minimising handling and appropriate PPE. Standard
Can saddle fit affect balance for older riders?
Absolutely. An unbalanced saddle—such as a high pommel that lifts the front—throws your weight back and can worsen stiffness. Use the pommel–cantle pressure test to confirm neutral balance. Source